The Old Kit
 Brewery kit can be very expensive, especially when bought new. However, it is possible to build the equipment for brewing on a pico-scale from salvaged items.
The original brew kit at Beer Nouveau was made almost exclusively from salvaged and reused items, mostly the single use eco-kegs that would otherwise be sent to landfill.
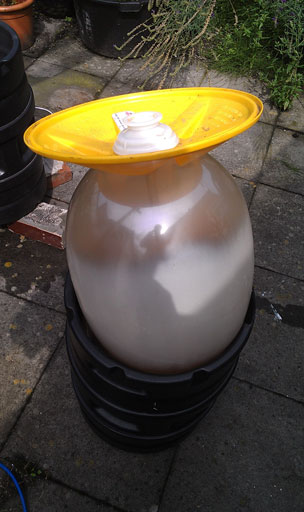 When opened up, as you can see from the photo, an eco-keg consists of the outer keg, and an inner bulb attached to a lid. The outer keg is made from food grade high-density polyethylene (HDPE) and is capable of holding its integrity to quite high temperatures. While suited ideally for nine gallon brewing, it will hold ten gallons comfortably.
Because the size of pico-brewing is not that different from home-brewing, here’s the instructions for making a similar kit yourself.
Hot Liquor Tank
Step 1: Seal the Bottom
 The first step is to block the holes in the bottom. Hold the keg up to the light and stick your head in it, make sure that the only light coming in is from the five holes, and not any obvious cracks.
To seal the holes you need to use 8mm bolts and nuts with sealing washers. If you can’t get sealing washers, you can use either rubber washers or off-cuts from a silicon baking sheet, , or just tighten them really tightly. But sealing washers will save you a lot of bother with leaks.
Before putting the bolts in, sand off the holes. The kegs are made in two sections and then heat-welded together, so there’ll be a raise joined that you’re best off sanding down now to save yourself work when they leak.
It’s important to do this step first to make sure that the keg is water-tight. There’s no sense if cutting all the other holes if you’ve got a cracked or leaky keg.
Step 2: Fit the Tap
 Once you’ve made the keg water-tight, you need to cut a hole in it. It’s best to get a tap that allows you to turn it on and off gradually, these allow you to control the flow-rate of the liquor and wort from your vessels.
Measure the size of hole needed, and cut one slightly smaller near to the base of the keg. Then sand the hole smooth until the tap is a tight fit. Make sure to hand-tighten it up as tight as you can. Taps come with rubber washers, make sure to use them (on the outside of the keg, thanks Thirst Class Ale!) as they really help stop leaks from a flat backed tap fitted to a round keg.
Once fitted, do another leak test. Fill the keg with cold water to above the tap hole, making sure there are no leaks and that the tap turns on and off easily.
Step 3: Fit the Element
For my first hot liquor tank I use a Tesco Basics Kettle element. There are other guides out there that show you in detail how to do this, just make sure that you use exactly the right size screwdriver head, because the screws used are cheap and will sheer off, and remove both of the heat cut-off discs.
Cut a hole in the side of the keg just slightly smaller than needed, sand it off and fit the grommet from the kettle element.
The hole for the element will need to be higher up than the tap hole, because the element will need to sit clear of the raised bottom of the keg.
When the element is snugly fitted, wire it in and then cover it. An old plastic pot, such as the sort that Campden tablets, gypsom, etc come in is ideal for this.
Step 4: Leak Test
 You’ve just wired up an electric element, make absolutely sure that it doesn’t leak. Water and electricity do not play nicely together.
Sit the HLT on some brick so that you can see any leaks, and then fill it almost to the brim with cold water. It may be water-tight with just a bit of water covering the bottom, but the weight and pressure of ten gallons may well create leaks. So fill it in stages, checking for leaks as you go. If it’s the nuts and bolts that are leaking, tighten them up as much as you can which should stop the leaks.
When you’re happy it’s not leaking, plug it in and switch it on and wait to see how long it takes to boil.
Stats
From tap to strike (16C to 80C) takes the HLT 120 minutes.
Cost:
Eco-keg: Free (http://www.blackjack-beers.com)
Nuts & Bolts: £1.10 (Accuscrews)
Sealing Washers: £1.00 (Wickes)
Element: £6 (Tesco)
Tap: £3 (www.themaltmiller.co.uk)
Total Cost: £11.10
Mash Tun
Step 1: Seal and Tap
For most things using the eco-kegs, sealing the holes in the bottom and fitting a tap are standard things, so follow the steps for the Hot Liquor Tank.
Step 2: Insulate


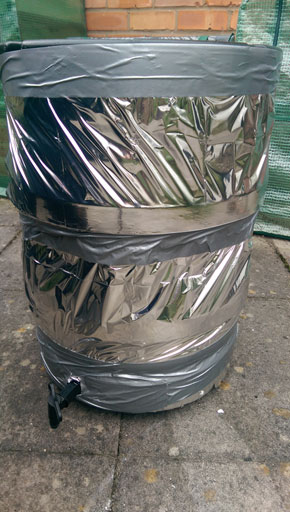
The choice of insulation is entirely up to you, whether it’s polysterene slats, camping groundsheets, old sleeping bags or blankets, or commercial insualtion products. In keeping with the reclaimation ethos of Beer Nouveau though, I used foil blankets that you get when you complete organised distance runs and bubble wrap from the boxes of empty bottles.
Firstly a sheet of foil goes on, then a layer of bubblewrap before an outer layer of foil sheet.
Step 3: False Bottom
 Cut the majority of the buld away from the lid, and remove the pipe from the spear. Then fit this inside the keg, right at the bottom. Next, pour a kettle full of boiling water over it, and push the false bottom down level.
The plastic from the bulb softens a bit with the heat, so you need to use that soft time to sort out the fit of the lid. Once it’s cooled down, remove it from the keg.
Next, drill lots of small holes in the bottom of the bulb to allow the wort to circulate and drain, while keeping the malt in the keg. To give a better, tighter fit, cut a length of cellar pipe to fit around the edge of the lid, and then slice it down the side so that it fits over the lip snugly. This makes it a bit tricky to get in and out of the keg, but also means less malt escaping the false bottom.
The completed mash tun looks a bit like a prop from a 70’s science fiction film, but with a lid it does keep the mash warm. I’ve not got photos of the lid finished yet, but it’s the lid from the eco-keg with polysterene to insulate it.
Stats
During the course of a mash the insulated tun loses 2C per hour.
Cost:
Eco-keg: Free (http://www.blackjack-beers.com)
Nuts & Bolts: £1.10 (Accuscrews)
Sealing Washers: £1.00 (Wickes)
Foil Blanket: Free (Great Run)
Bubble Wrap: Free (came as packaging in the post)
Tap: £3 (www.themaltmiller.co.uk)
Total Cost: £5.99
Boiler
Step 1: Seal and Tap
 Pretty much everything using the eco-kegs requires this, so follow the steps for the Hot Liquor Tank.
The boiler itself is very similar to the HLT, but uses a bigger, better element. The boiler needs to be able to get the wort up to a good rolling boil, and keep it there. So I splashed out on an element online.
The size of the hole and the fitting is very similar to the Tesco element, but involves less fiddling with wires and screws, so if you’re not comfortable with that, or don’t mind spending a little more to save the bother, buy and fit a proper element. This one cost me £30, so they’re not that expensive.
Step 2: Leak Test
As with the HLT, leak test, thorougly. You’re mixing water and electricity in close proximity here, so make sure there’s no leaks.
Once you’re happy with it, plug it in and test it’s working.
Step 3: Insulate
An insulated boiler loses less heat, and therefore uses less electricity to get the wort up to a rolling boil, and keep it there. Follow the same steps you use for the mash tun to insulate your boiler.
Stats
From tap to boil (16C to 99C) takes the Boiler between 75 and 90 minutes, but you’ll usually be heating from mash temperature to boil which will be a lot quicker.
Cost:
Eco-keg: Free (http://www.blackjack-beers.com)
Nuts & Bolts: £1.10 (Accuscrews)
Sealing Washers: £1.00 (Wickes)
Element: £20 (Copper Kettle)
Tap: £3 (www.themaltmiller.co.uk)
Total Cost: £25.99
Malt Bins
 When making the other parts of the brew kit, if you’re anything like me you’re bound to crack or cut a keg in some way that will make it impossible to be water-tight. Small cracks can be sealed using a soldering iron, but larger ones can’t. Thankfully, they’re just the right size to hold a 25kg sack of malt.
The Old Dray
Historically brewery drays were wooden carts pulled by shire horses, and apart from the obvious “waste” they produced virtually no pollution in either their construction, maintenance or daily running. And while we didn’t have the space to keep a pair of Shire Horses, we did aim to produce as little environmental damage as we could when delivering our beers.
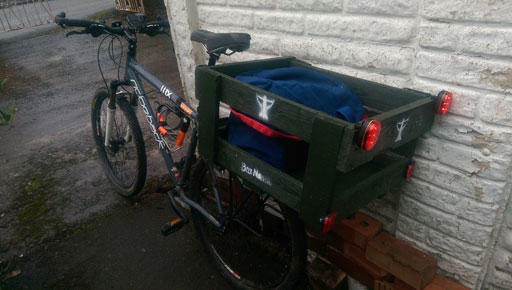 To this end, our deliveries were done either on our specially converted bicycle, public transport, or occasionally by foot!